Creating a Rag Doll: A Step-by-Step Guide for Beginners
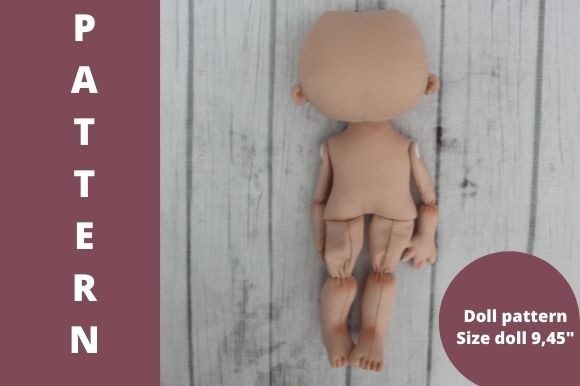
Rag dolls are a beloved craft that combines creativity, patience, and a touch of nostalgia. Whether you're a beginner or an experienced crafter, making a rag doll can be both rewarding and therapeutic. This article provides a detailed guide on how to create a 23–24 cm (9.06–9.45 inches) rag doll using a pattern designed for easy sewing and customization. The pattern is printed on an A4 sheet, making it accessible for most home sewers. We'll walk through the process from start to finish, including allowances for seams and tips for achieving a soft, lifelike appearance.
Understanding the Rag Doll Pattern
The foundation of any rag doll is its pattern. This particular pattern is tailored for a small-sized doll, ideal for children or as a decorative piece. The size range of 23–24 cm ensures that the doll is manageable for beginners and allows for intricate detailing without overwhelming the sewer.
The pattern is designed with seam allowances in mind, which means you won't have to add extra space manually. Each piece includes built-in allowances for stitching, ensuring that the final doll fits together seamlessly. The pattern is printed on an A4 sheet, making it easy to handle and follow. It's also translated into English, so language barriers are not a concern for international crafters.
Materials Needed for Your Rag Doll
- Pattern paper (A4 size)
- Soft fabric (cotton, flannel, or felt)
- Scissors
- Sewing needle and thread
- Button or eyes (optional)
- Stitching pins
- Iron
- Optional: stuffing material (polyester fiberfill)
These materials are essential for completing your project. The choice of fabric will affect the doll's texture and durability. Flannel is a popular choice due to its softness and ease of handling, while cotton offers more structure and is easier to sew. Felt is another excellent option, especially if you're looking for a thicker, more textured look.
Preparing the Pattern
Before you begin sewing, it's important to carefully cut out all the pattern pieces. Make sure to follow the instructions provided with the pattern. If you're working with a printed pattern, use a ruler and sharp scissors to ensure clean, precise cuts. Always double-check that you're cutting the correct number of pieces for each section of the doll.
If you're using a digital version of the pattern, download and print it at the correct scale. Ensure that the print settings are set to "actual size" to avoid any distortion. Once printed, trace the pattern pieces onto your fabric using a fabric marker or chalk. This step helps prevent errors during the cutting process.
Assembling the Doll Body
The body of the doll is the first major component to assemble. Begin by sewing the front and back pieces together along the sides and bottom. Use a basic straight stitch, and make sure to keep the seams even. Once the body is sewn, turn it right side out and stuff it with polyester fiberfill. Be careful not to overstuff, as this can cause the doll to become lumpy or misshapen.
After stuffing, fold the top edge of the body inward and sew it shut. This creates a neat, closed top that gives the doll a more realistic appearance. Repeat this process for the arms and legs, ensuring that each piece is properly stuffed and secured.
Adding Details and Finishing Touches
Once the body is complete, it's time to add details such as eyes, a mouth, and any additional features like hair or accessories. These elements bring the doll to life and give it a personalized touch. You can use buttons for eyes, or sew on embroidered details for a more intricate look.
For the face, consider using a simple embroidery technique or hand-stitched details. Some crafters prefer to use felt or fabric scraps to create a nose or mouth. These additions can be easily attached using small stitches or adhesive. Keep in mind that these details should be subtle enough to maintain the doll's overall charm and simplicity.
Finishing the Doll
After adding all the necessary details, it's time to finish the doll. Ensure that all seams are neatly trimmed and that the edges are smooth. If desired, you can add a button or a bow to the doll's head for a final touch. This step adds a sense of completeness and professionalism to your finished project.
Finally, place the doll in a safe location to let it rest for a few hours before displaying it. This allows the stuffing to settle and ensures that the doll maintains its shape and form.
Where Can a Rag Doll Be Used?
Rag dolls are versatile and can be used in various settings. They make excellent gifts for children, providing both comfort and companionship. Many parents choose to create custom rag dolls for their children, allowing them to personalize the design and features. These dolls can also serve as comforting toys for bedtime or as part of a collection.
In addition to personal use, rag dolls can be sold or donated to organizations that support children's well-being. They are often used in therapy sessions to help children express emotions and build confidence. Artists and crafters may also use rag dolls as part of their creative projects, incorporating them into displays or installations.
Who Benefits from Creating a Rag Doll?
Creating a rag doll can benefit a wide range of individuals and groups. For children, it can be a fun and educational activity that encourages creativity and fine motor skills. For adults, it offers a relaxing and meditative hobby that can reduce stress and promote mindfulness.
Professionals in the fields of education, therapy, and child development may find value in creating rag dolls as tools for teaching or emotional support. Business owners and creators can also benefit by offering rag doll-making workshops or selling handmade dolls as unique products.
Strengths and Considerations
One of the main strengths of creating a rag doll is the ability to customize it according to personal preferences. Unlike mass-produced toys, rag dolls allow for individual expression and creativity. They are also relatively easy to make, making them accessible to people of all skill levels.
However, there are some considerations to keep in mind. The process requires patience and attention to detail, especially when it comes to assembling the pieces and adding finishing touches. Additionally, the quality of the final product depends heavily on the materials used and the care taken during the sewing process.
It's also important to note that rag dolls may not be suitable for very young children due to the risk of small parts coming loose. Always supervise children when they are playing with or near the doll.
Practical Expectations
When creating a rag doll, it's important to have realistic expectations. While the end result can be beautiful and satisfying, the process may take several hours or even days to complete, depending on the complexity of the design. It's best to approach the project with a positive mindset and enjoy the journey rather than focusing solely on the outcome.
Additionally, the final product may vary slightly from the intended design due to the nature of the materials and the manual aspects of the process. Embrace these variations as part of the creative experience and appreciate the uniqueness of your handmade creation.
Conclusion
Creating a rag doll is a rewarding and fulfilling project that combines artistry, craftsmanship, and personal expression. Whether you're making it for a child, as a gift, or simply for your own enjoyment, the process offers a sense of accomplishment and satisfaction. With the right materials, a clear pattern, and a bit of patience, you can create a charming and meaningful rag doll that brings joy to all who see it.